Working with files and modern cloud apps – Part 1
Recently we got a request from a large manufacturer to help them with some file processing. Their specific requirement was to have Fixed width file formats converted into XML and pushed into Amazon S3 for the further processing.
While going through the conversation with them I felt it would be a good idea to layout a series of blogs on working with different file formats and how you can use DBSync easily to transform it and make it available on the cloud.
When you look at the file format, you will find many formats, we will focus on 2 popular ones:
1. Fixed Width – columns which contain fixed size (common with Mainframes)
File format:
| Field name | Type | Start | End | Length |
| Record_ID_Header | String | 1 | 3 | 3 |
| Invoice | String | 4 | 9 | 6 |
| Invoice_Date | String(yyyy-mm-dd) | 10 | 19 | 10 |
| Customer_Number | String | 20 | 29 | 10 |
| Invoice_Total_Amount | String | 30 | 40 | 11 |
Sample:
0011234562017-03-30AA123456BB 103.12
0021234572017-03-30AA123456BB 1243.12
0031234572017-03-31AA123456BB 43.12
0041234582017-03-31BB123456CC 13.12
2. CSV – Comma Separated Values. The same data above when viewed as CSV will look like
Sample:
001,123456,2017-03-30,AA123456BB,103.12
002,123457,2017-03-30,AA123456BB,1243.12
003,123457,2017-03-31,AA123456BB,43.12
004,123458,2017-03-31,BB123456CC,13.12
In each of the topics below we will take a file format, transform it and push to a cloud app like Salesforce, Amazon S3 and other popular ERPs.
Reading Files
Setting up the connectors is a fairly straightforward process. While defining the file connection Cloud Workflow does not look at the file location, rather it just looks at what is the definition of the each row of the record. It simplifies the configuration as if you were using a CSV file to process. In the case below, we have a file with fields as “Record_ID_Header,Invoice,Invoice_Date,Customer_Number,Invoice_Total_Amount,processdate”:

If you have a Fixed Width file, then the file reader treats each row as its own data type, you just need to mark it as “ROW”:

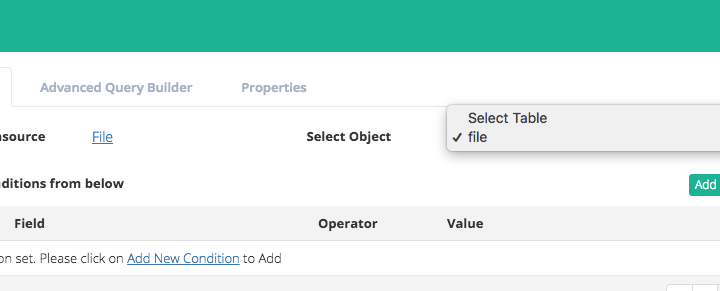
Now that you have set up the definition of the data file, you will next build your trigger rules. This is where you will set up source files. The Trigger provides the integration engine the definition of invoking a set of rules. In this case we have selected the source file as the Trigger Adapter and the file as the Object. In this example we will be converting a “Fixed Width” file into a “CSV” file.
In this example we have a source which looks like the following:
0011234562017-03-30AA123456BB 103.12
0021234572017-03-30AA123456BB 1243.12
0031234572017-03-31AA123456BB 43.12
0041234582017-03-31BB123456CC 13.12
And we want the Target to be:
001,123456,03-30-2017,AA123456BB,103.12
002,123457,03-30-2017-,AA123456BB,1243.12
003,123457,03-31-2017,AA123456BB,43.12
004,123458,03-31-2017,BB123456CC,13.12
(Notice that in the target, we have the date format changed)
Then we move the “Properties” tab to set up the file location, format and other related values. In case there is a need to format the output into XML, you can use the XML Formatter.
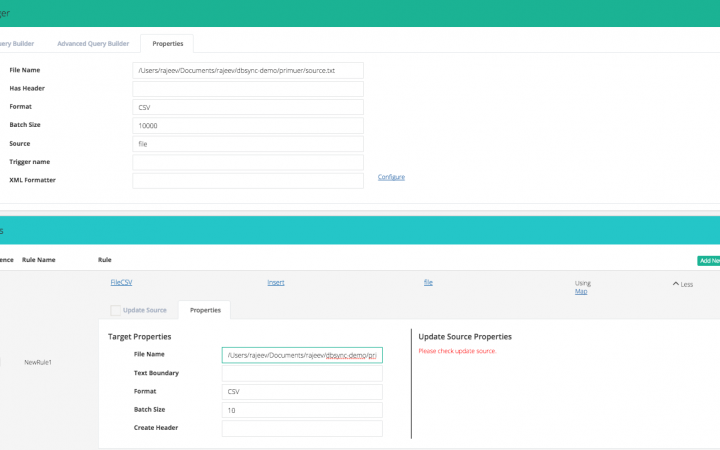
In the above screenshot, we have already created a rule, telling it to write use the “FileCSV” adapter. When setting it up, similar to Trigger, in Rules, we set up the fields on location of the file, Column Separators (default for CSV is “,”) and other values.
Finally we perform data mapping:
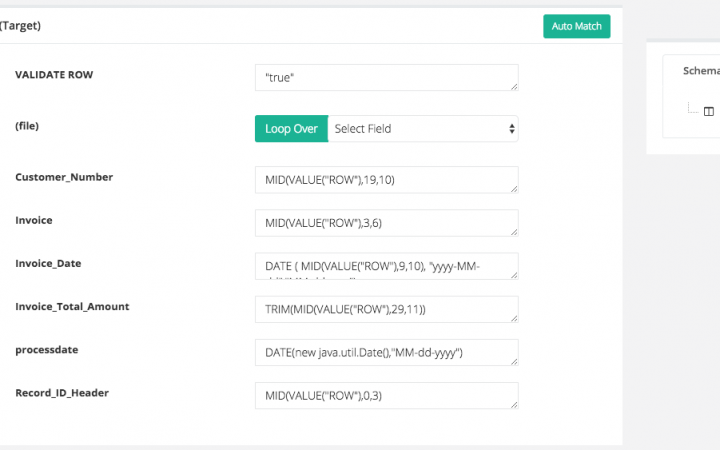
Lets walk through the mapping
-
- VALIDATE ROW: a “true” value tells the engine to process every row
-
- (file): since its flat structure, we will not loop around any children for each row. This is useful when you have XML with multiple hierarchies
-
- Customer_Number: takes the ROW from 19th character to 29th (19 +10) using the MID function
-
- Invoice, Record_ID_hearder: similar to Cusotmer_Number, we use MID function to get characters from the row
-
- Invoice_Totol_Amount: here if you notice in the source data that there were some empty fields before the number since there was left space padding applied to those numbers. When pushing it to CSV, we have to TRIM (function) it.
-
- Invoice_Date: here we have transformed the Date from yyyy-MM-dd (example – 2017-03-30) to MM-dd-yyyy (which will make it 03-30-2017)
DATE ( MID(VALUE(“ROW”),9,10), “yyyy-MM-dd”,”MM-dd-yyyy”)
MID(VALUE(“ROW”),9,10) – Extract value from the source ROW
DATE ( …, “yyyy-MM-dd”,”MM-dd-yyyy”) – Transforms one date format to the other date format.
- Invoice_Date: here we have transformed the Date from yyyy-MM-dd (example – 2017-03-30) to MM-dd-yyyy (which will make it 03-30-2017)
- processdate: an easy way to format current time. As you can see that we can easily incorporate Java code within our transformations
Converting into XML
Now lets look at how to convert it into XML:
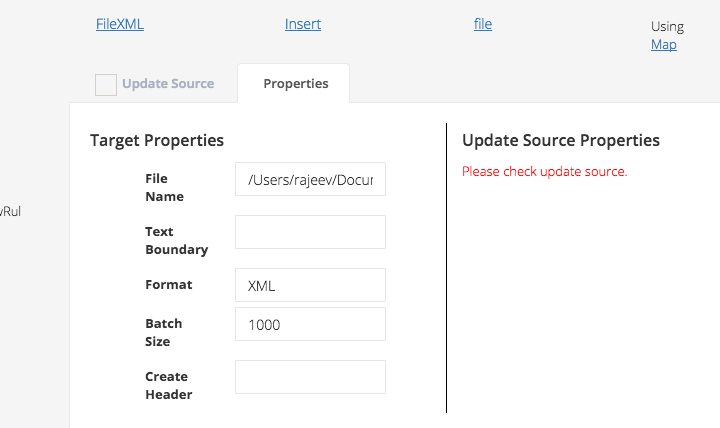
-
- First make sure you have a connector with top level fields defined (see above for FileXML)
-
- Within the rule, go to Properties section and just change Format to XML
- You can reuse the same mapping as that of CSV as above
When you now run the integration, you will have the XML get generated as the following:
<row>
<Record_ID_Header>001</Record_ID_Header>
<Invoice>123456</Invoice>
<Invoice_Date>03-30-2017</Invoice_Date>
<Customer_Number>AA123456BB</Customer_Number>
<Invoice_Total_Amount>103.12</Invoice_Total_Amount>
<processdate>04-27-2017</processdate>
…
</row>
Hope this gives you a glimpse of using DBSync to process flat files. This is a quite common use case when exporting / importing files from Mainframes or legacy applications.
In the next blog we will discuss moving these files between storage and other CRM and ERP applications like Salesforce, NetSuite, Microsoft Dynamics 365, popular databases and more.
We would be delighted to discuss your use case and explore how DBSync can support your success. Please feel free to Schedule a meeting with us.

